|
|
 |
Your Andis, Oster, Laube, Wahl, Lister, Clipmaster
and other brand clipper need service or repair? Fast service? Need to diagnose clipper problems? Read on! Basic service Andis/Oster/Wahl $30.00, Laube and large animal clippers $35.00
(Clipmasters, Lister Star, Andis). Parts and labor intensive repairs extra. Send
to: Bruce's Sharpening
PO
Box 41 (if mailing USPS)
Maxatawny,
PA 19538 For UPS or FedEx us 15868 Kutztown Road instead
of the PO Box
When sending a
clipper for repair please put a note on it or in the box about what is wrong or what
service is required. This is especially important on intermittent problems. Let me know if
is making unusual noise, was dropped, won't hold a blade, is intermittent, or whatever the problem or service request is.
If you tend to stick your clippers on a shelf when they are no longer working correctly, take the time to write down what
occurred and wrap a note around the clipper. This will make my job much easier and get you the correct service.
For
information about clipper problems there are some
helpful procedures further down this screen so scroll on down. You
are certainly welcome to email me (brucesharp1@yahoo.com) or call about your problem clipper (610 683-5175)
Bruce's Sharpening can repair,
fix or service Oster, Andis, Laube - limited , Lister Star, Clipmaster and Wahl clippers for the pet grooming, ranch
or farm grooming, salon and barber shop businesses (not trimmers). Parts for most common models are stocked here (well
not so much in 2023-2024 apparently too due to supply chain issues!) Clippers (or buzzers as some call them) are cleaned, brushes
checked, hinge and latches are checked, lubrication is done, cords are checked for shorts, opens or frayed unsafe conditions.
Blade drives on Andis or lever & links on Osters are replaced. Armatures and electronic switch boards are checked.
Some parts for older clipper models are still available in limited quantity. I keep some here. Some vintage armatures can
be rewound for a high cost but if you have a sentimental attachment this might be a choice for some. Some parts for Oster
A2, model 10 and progienic clippers are available still. I can modify an old Oster Model A2 head to take the more modern
A5 blades. $50.
.
Email me (brucesharp1@yahoo.com) to go over your
problem.
I stock all the parts for Andis Master clippers
but no longer have any of the power cords for the old plug in model Masters. I carry the wire in power cords and can
modify the older plug in corded Master to a wired in cord..
Andis AG, AG2, AGP, AGC, Ultraedge, SMC, and as are parts for most pet grooming and large
animal clippers and Oster 76, Master, etc. parts are mostly in stock here for servicing your clipper.
Most trimmer type clippers are marginal to repair due to their lower initial
cost and the labor time to service so normally not done.. Blade sharpening some trimmers is not possible due to design and
seldom worth the time it takes.
Limited
Laube service is available here. I can replace your broken laube case (housing), repair a bad wire in the cord, replace
noisy drive bearings, replace a bad hinge and so on. Laube has a 5 year electrical motor parts warranty so if you have a motor
problem and the clipper is still under the warranty period send your clipper to Laube for least costly service, if not the
quickest! Laube motors are expensive complared to other brands but a lot cheaper than a new Laube. A problem with older Laube
cases cracking near the drive screw area is common. According to Laube this is due in part to the use of Kool Lube spray getting onto the
housing.
Note that Kool Lube or similar "cooling" products should only be sprayed on the back
(the part that touches the animal) part of the blade, not the front or into the clipper or on the clipper body.
These cracks can be severe enough that the entire front of the clipper falls apart in little pieces. I have a photo of one
that did that while sitting on my work bench! Laube now only supplies Yellow
replacement cases. Email me (brucesharp1@yahoo.com) to see if I can help with your Laube
problem.
*
The newer Oster's A5's have had a problem with the hinge screws loosening. The fix is to remove the screws
and clean off the oil on them and the threads inside the clipper body. Then apply lock-tite thread sealant (A.K.A. thread
locker) to the well cleaned threads. This will help keep them from loosening. The screw holes goes through into the rear housing
where there's a lot of lubricants. As the screw threads get oil/grease from the inside opening they can loosen from the vibration
of running. Tighten the screws firmly but don't over tighten. I can perform the service here. If the hinge screw brass
inserts pull out you may have to have the case replaced with a new one, often. I can install new inserts that thread in instead
of pressed like Oster uses that will not pull out.
Oster bearing misalignment:
A more common problem with Oster A5 and Oster 76 clippers is the sleeve bearings getting out of alignment. This can
happen if the clippers are dropped or knocked hard against a cabinet or some such. Oster A5's and Oster 76 clippers use sleeve
bearings instead of ball bearings other brands use. Sleeve bearing are bearings made of bronze and are round in shape with
a hole in the middle for the armature (motor) shaft to go through. If the bearing goes out of alignment then the shaft of
the armature will be pinced casuing heat and a slower running clipper. The bearings need to be knocked back into alignment.
Below there is a picture of the bearings on an armature. The bearings sit roughly where the oil button is at the front end
and just behind the brushes in the rear. By tapping the housing where these berings sit you can hear the clipper either speed
up or slow down. Speed up is what you want! In the shop we use an ampmeter to meaure how much current the clipper is drawing.
Out of alignment bearings will cause high current draw. Ideally the current should be less than around .3 amps (300 MA). I
watch the ampmeter while tapping on the housing until the current draw is normal. Out of alignment bearings can have current
draws over .4 to .5 amps. The max should be .33 amps. I use the handle of a screwdriver to tap the housing. You can also tighten
or loosen the two screws that hold the switch on. These can also help realign the bearings. Good luck doing this yourself.
Lister Star clipper
have two main issues. If a blade can't be moved due to overly tight tension or rusted together blades the plastic gear will
strip and have to be replaced. These are press fit so not a do it yourself job for most. I recommend if the clipper has not
been run for a while and there is a blade on it take the blade off, oil it and put it back on. This procedure will save a
lot of gear replacements! The other main Lister Star problem is the filter gets so clogged that the motor overload reset trips.
Change the filter and then press the red reset button in the back. I carry both the gear and filters for these as well as
blade mounting pins which need to be replaced time to time when the blade starts to rattle. I sharpen the Lister blades currently
for $10.50
I service a lot of Oster/Sunbeam
Clipmasters. Replacing broken yokes and tension plates, cords, switches, armatures
and brushes are the most common issues. The clipper heads may need to have the bearing replaced if it gets too worn. The Clipmaster
tends to get a lot of hair built up inside so need to be cleaned out. Keep the filter screen clean. Clipmaster blade sharpening
is currently $10.50. I carry replacement blades for these.
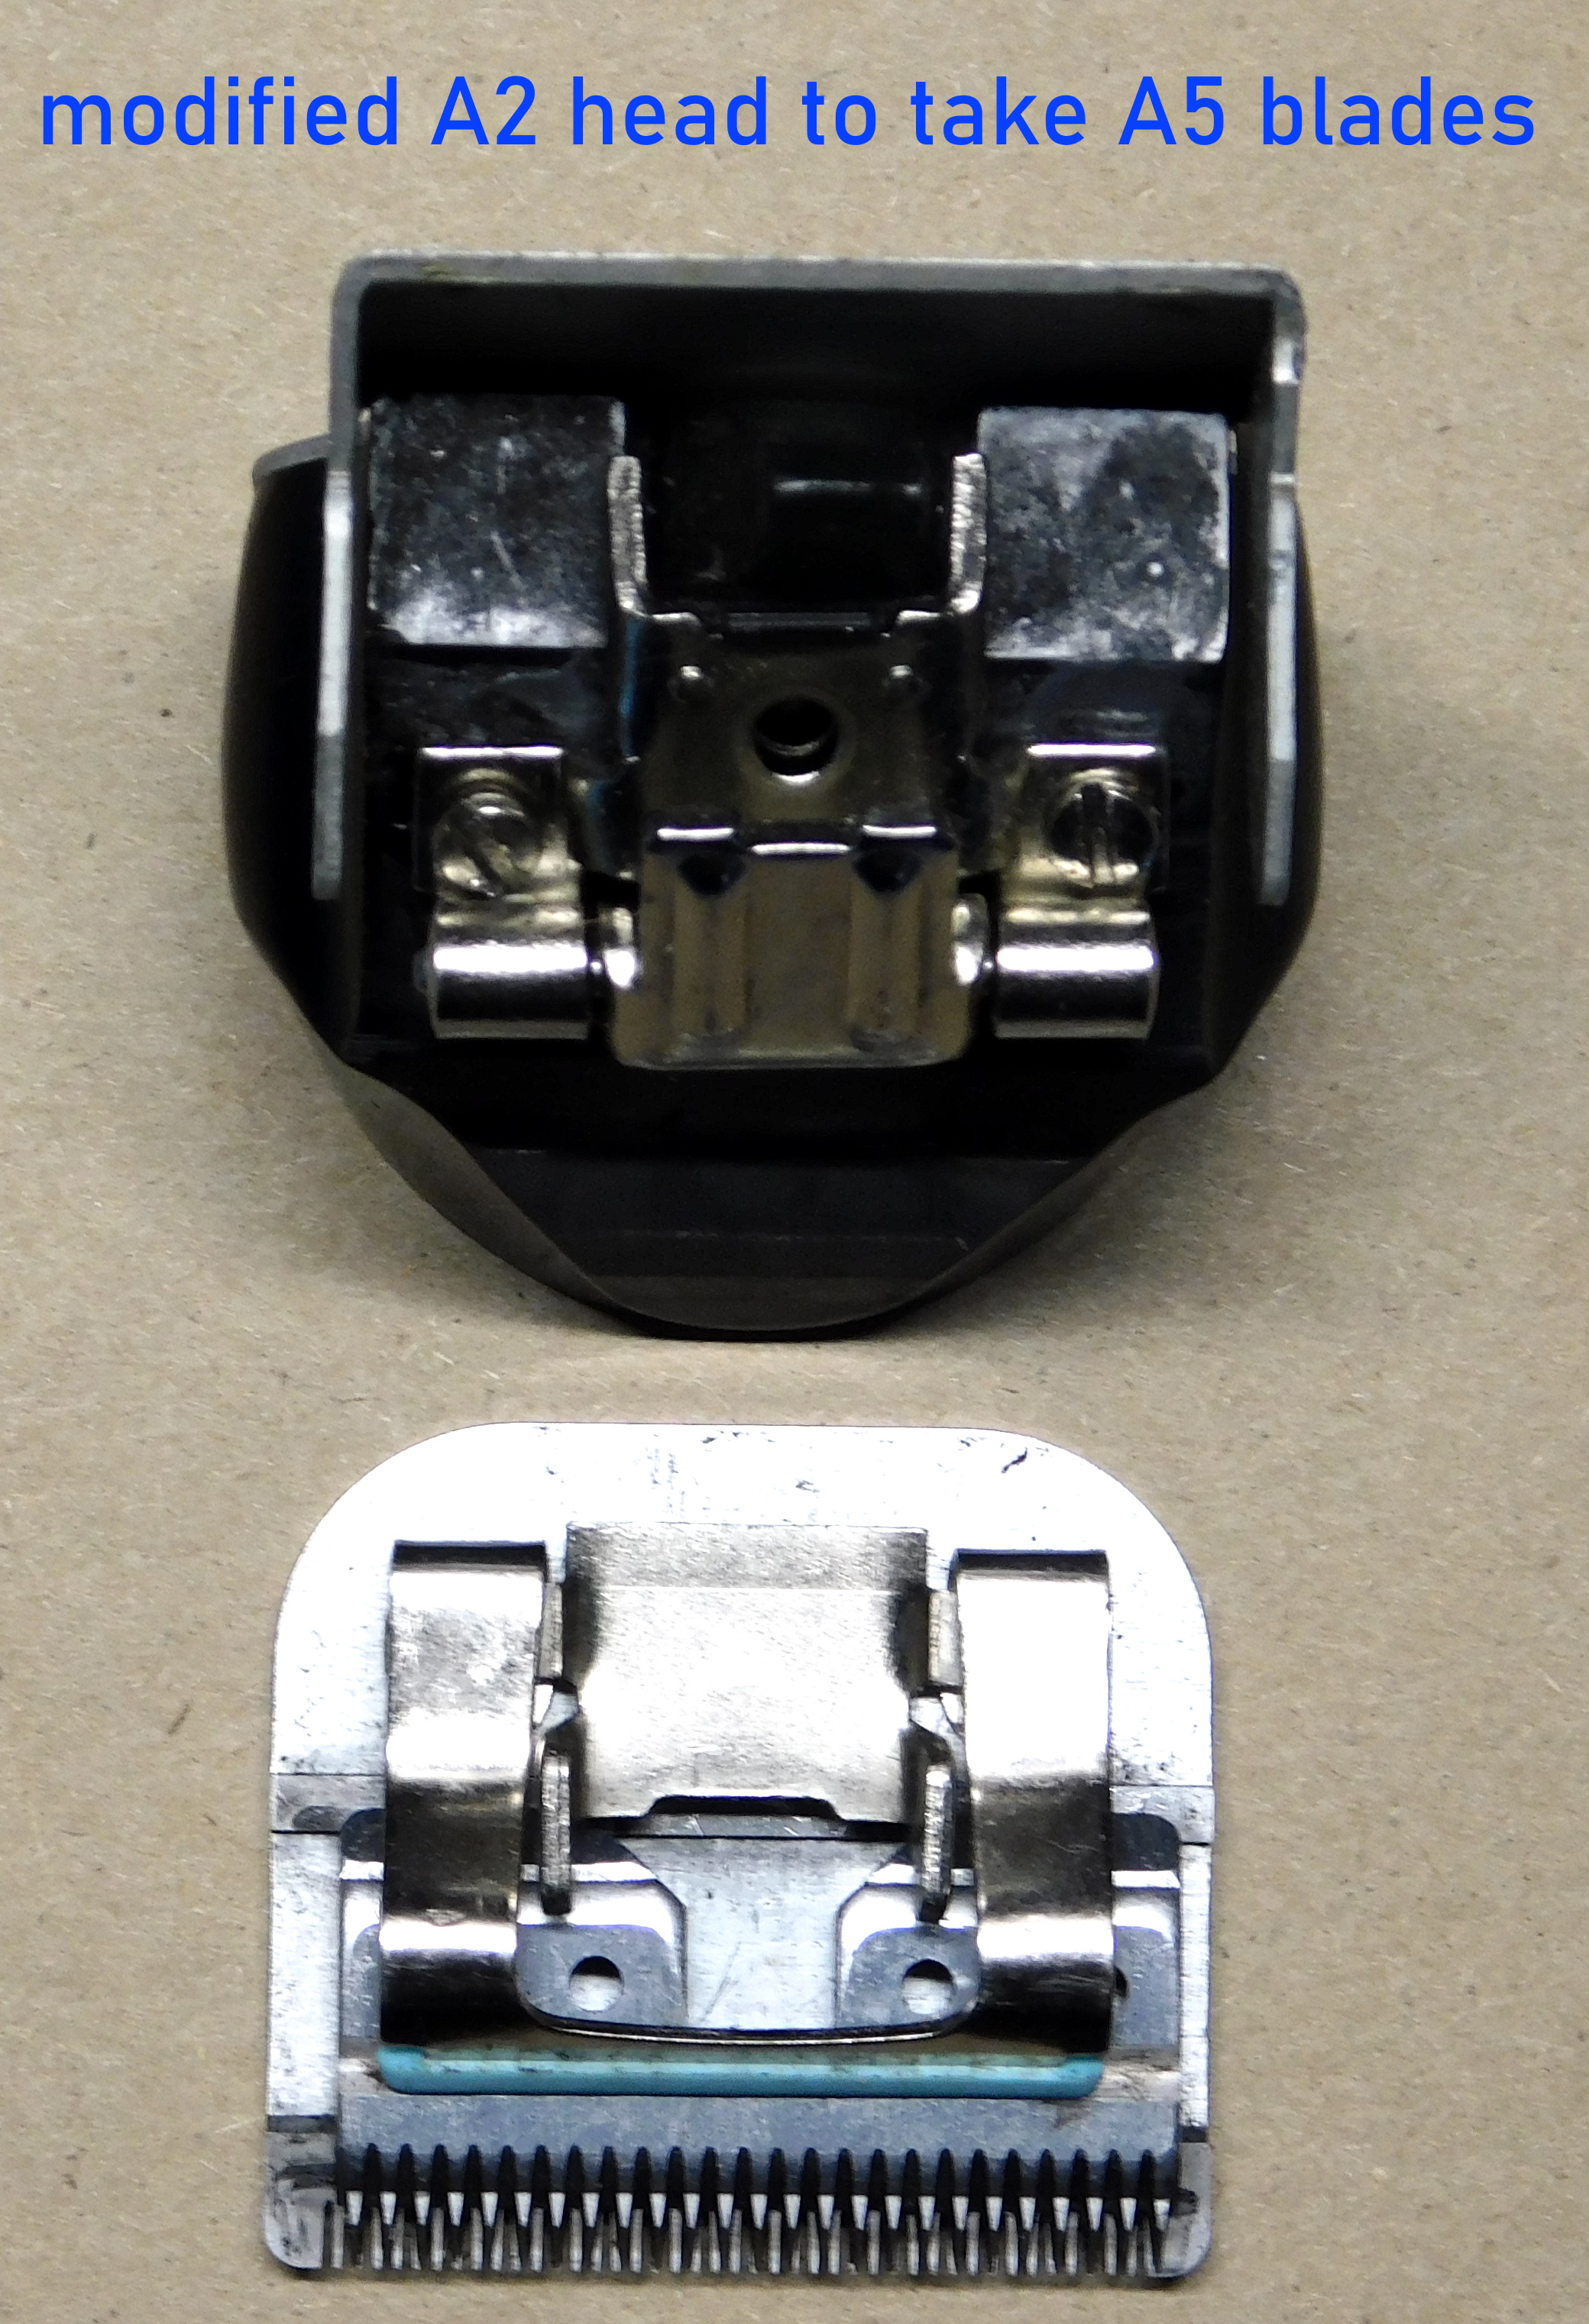
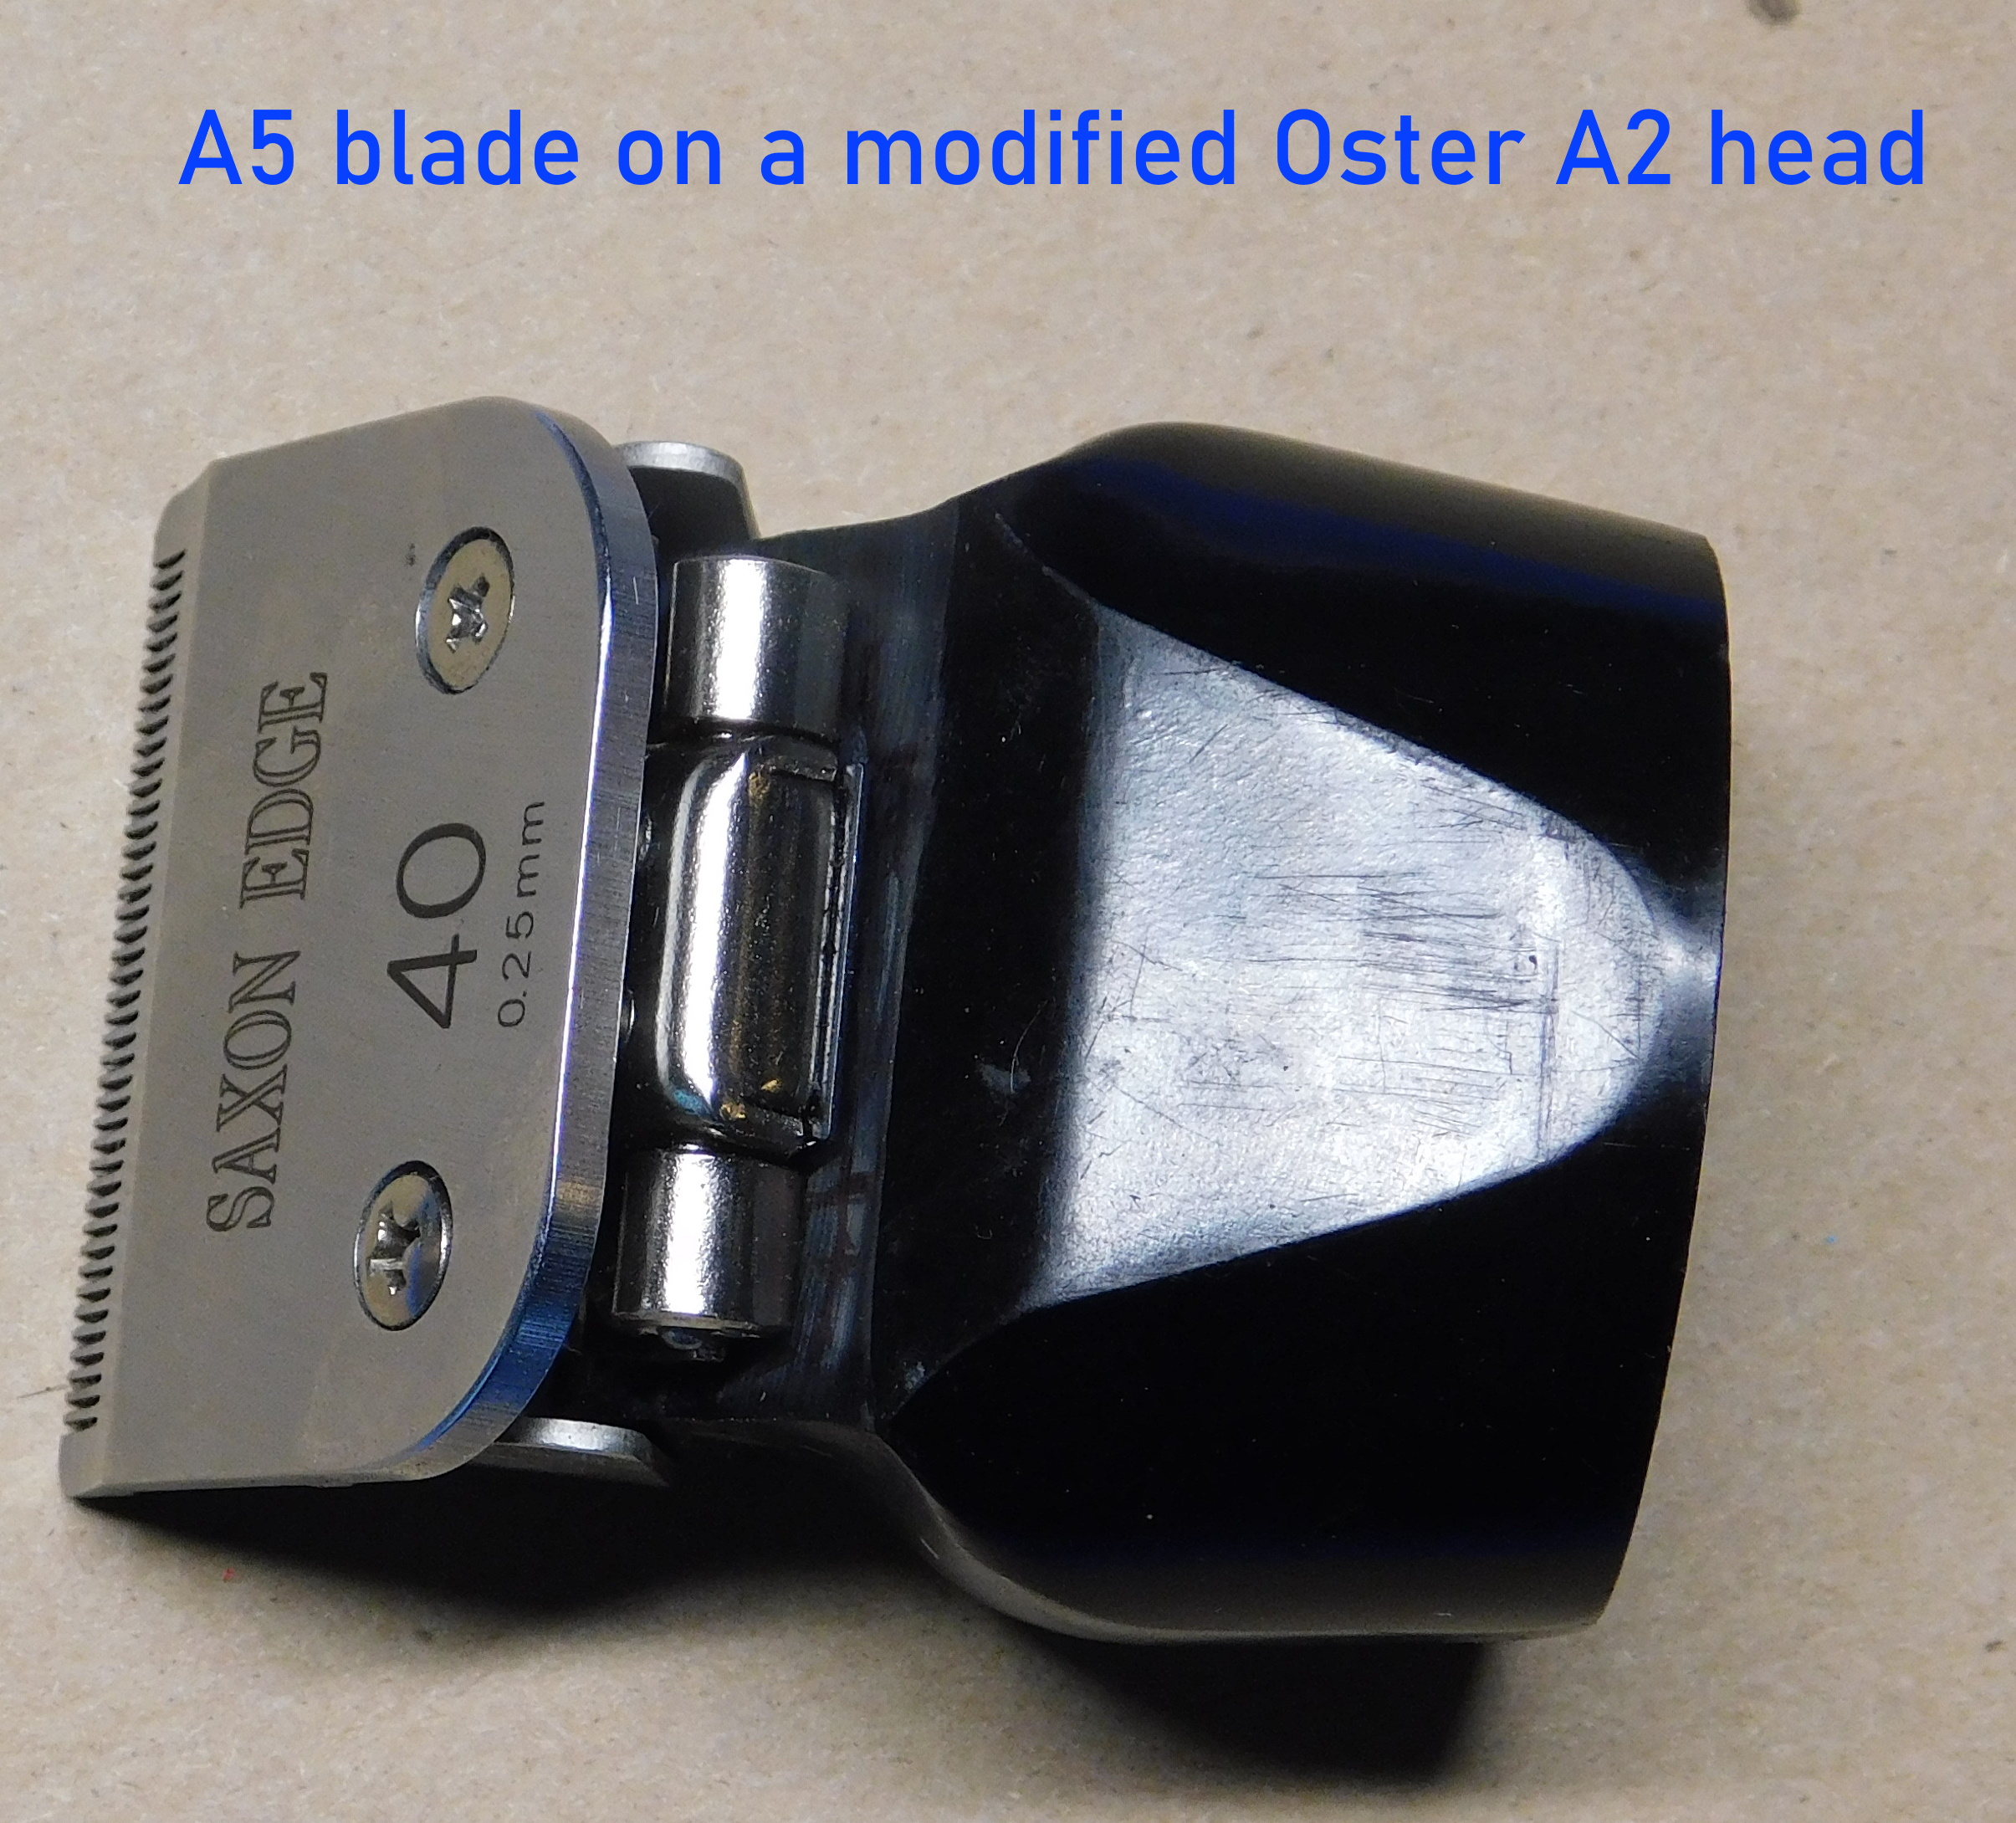
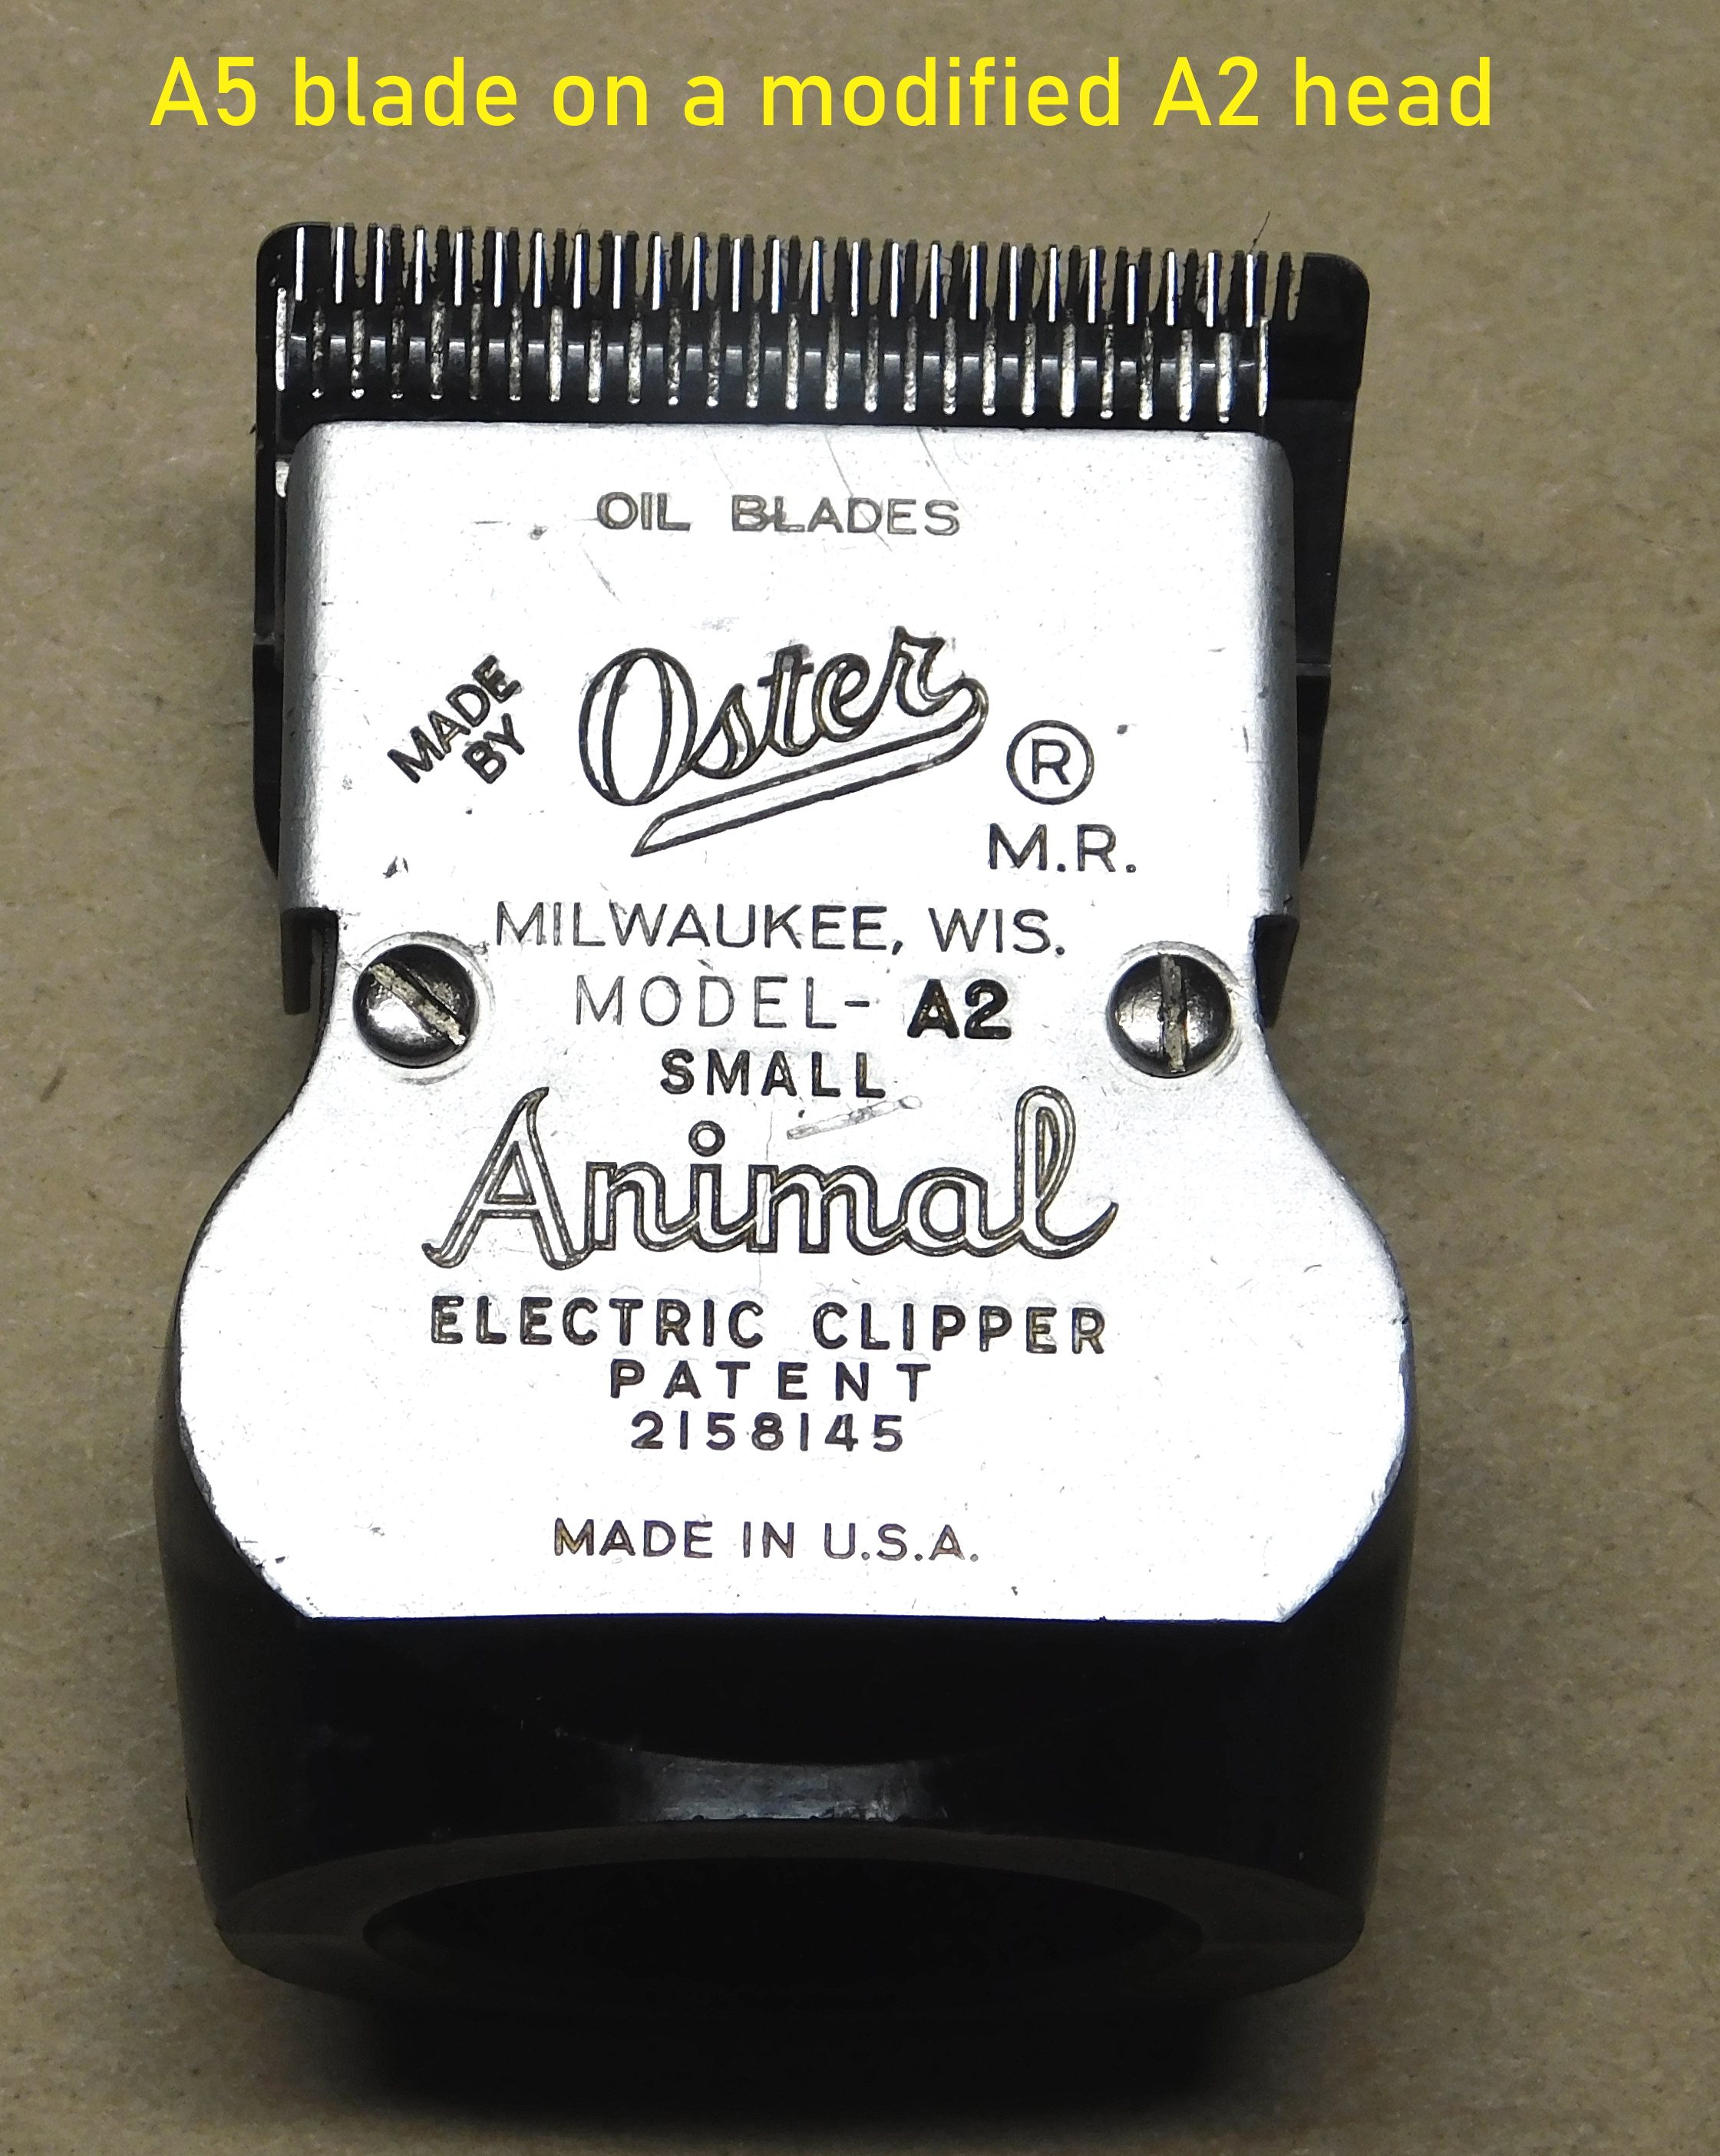
New since 2018 for the Oster A2 clipper. Modified A2 heads that accept
common A5 style detachable blades. No need to find scarce old A2 type blades anymore. $25 a head if you provide a head, $40
otherwise.
| Modified A2 heads to take A5 clipper blades |
|
| Modified A2 heads to take A5 clipper blades |
|
| Modified A2 heads to take A5 clipper blades |
|
| Oster A5/76 armature and bearing placement |
|
|
Blade rocks front
to back, corn rowing, vibration, rattling. If the rear of the socket becomes raised
and the blade can be moved up and down when mounted on a clipper the rear of the socket
has become raised. Use pliers to press the rear of the socket down as shown in the picture below. Keep
the pliers only on the left and right sides not
in the middle—you don’t want to create a belly in the metal socket. Keep
checking until the hinge tongue fits snugly without play. If the socket is bent too far down the hinge tongue won’t
fit into the blade. Use a flat blade screwdriver to pry the socket back up until the clipper
hinge tongue fits snugly without resistance. A raised socket usually comes from a groomer trying to remove a blade from a
clipper with a hinge with a blade latch when they also use the Andis AG clippers that don’t have a blade latch and the
blade just presses off. Note that I carry replacement sockets and springs which are better quality than most that come with
many brands. Is your Andis clipper running slow or malfunctioning?
Sometimes this is caused by a bad switch electronic board. Sometimes dropping the clipper can
result in a broken capacitor lead (wire), or both leads breaking
and the capacitor becomes loose - hear a rattle inside your clipper?
It could be your switch or a broken screw post. A bad switch board can sometimes cause an armature to go
bad or vice versa, a bad armature can cause a switch board to also fail. Most all of the problems described here and to the
left are the result of impact to the clipper. Don't drop them! Moisture getting inside
can blow your armature, it may stop running, run erratic or run hot. Keep liquids from getting inside! The improper use of
a blade wash can short an armature. Keep the clipper pointed downward and use a cloth to remove any excess before the clipper
is brought upright. Switchboard photo below. To enlarge any picture left mouse click
or touch on table or phone:
|
|
|
The Andis Master clipper
generally has few problems but if dropped the blade drive
adjuster can be damaged. This can be easily fixed with a new ball pin which I can do here. The power cord is another source of occassional issues. If your clipper suddenly stops or pauses while you are moving the clipper a wire inside the cord
has probably broken. It will make contact most of the time but certain positions will cause it to open and fail. Unfortunately
the plug in type ML cords are no longer produced. Only the wired versions are still available. Or, I can modify your Plug In Old model ML to use a wired cord.
Cost is around $55. New cord, switch, switch actuator, switch button, internal machining, switch insulator, wiring is involved.
The Master motor is a vibration coil and shunt arm type. The gap of the
shunt arm has to be correct for optimum performance. The small screw on the side adjusts this gap. If
you over turn this screw and the clipper blade no longer goes back and forth the easiest way to get back to the correct position
is to remove the top and move the screw and observe the gap as it opens or closes. Around 1/8 of an inch or so and it should
start to run again. Do this while the blade is on. While you have it open check the tightness of the two screws right
at the front top. These hold the "fork" which the cutter blade attaches to. If these get loose or move you may not
have enough cutter tension against the comb blade to cut or the position of the cutter will be off to one side or the other.
Or, you just have a dull blade and it needs to be sharpened. This covers most of the Master issues. If you have any questions
please Email me at brucesharp1@yahoo.com. Phone calls are very iffy here - too busy.
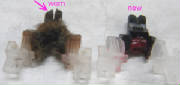
| Damaged Andis grooming clipper blade drive |
|
| Good and worn Andis blade drives |
|
| Andis drives through the years |
|
|
| undefined |
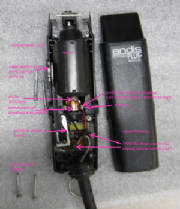
Changing an Andis blade drive used in many Andis models
The pictures below tell a lot
of the story but basically here's what you do. 1. Unplug the clipper. 2. You will need a #2 Phillips screwdriver to remove the 4 screws that hold the lower housing to the upper housing. Note
that the top screws are longer than the bottom screws. Turn the clipper over and remove the upper
housing from the lower. The cord will usually stick to the upper housing so separate it. The hanger may become loose, pay
attention. Clean the area by the blade drive and then using a #1 Phillips screwdriver
remove the two blade drive screws (turn to left to loosen). Use your finger nail or small flat blade screwdriver to lift up
the old blade drive. Clean the area where the blade drive was. Push the blade drive bearing to it's lowest position
and install the new blade drive, the 2 small holes fit over the pins, the tabs fit in the slots and
seat the drive fully. Re-install the 2 drive screws (turn screwdriver to right). Don't
over tighten but tighten firmly. While you have the housing open, check the black slide switch where you push
it. Hair can build up here and cause the clipper to stop and start intermittently, clean out any hair with a small
tool/tooth pick. If the commutator is black instead of copper shiny it may be time for service to clean the
armature. The cord strain relief has two notches in it that fit over the hanger (down), the top side has 1 notch. Re-install
the top housing. Hold the housings together with one hand and turn over and re-install the 4 screws - again tighten firmly
and the two housings should just come together without any gaps. Long screws in top, short ones in cord end. Congratulations!
| Andis AG |
|
| Andis clipper drive area |
|
| Andis clipper |

|
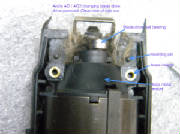
How To Change an Andis AGC Blade Latch Note that before replacing the latch make sure
the spring in the hinge hasn’t lost its blade holding power. With the hinge closed place a screwdriver under
the tongue and pry up. If the tongue initially lifts
without much resistance the hinge is too weak to hold a blade on firmly. Replace the hinge. More common in Andis AG
style hinges but the AGC hinge can get weak also. Remove
the two screws that hold the hinge and latch to the clipper. Set aside the two screws. There’s a metal spacer that sits
under the hinge/latch on AGC ‘s. Note the orientation of the spacer before you remove it. Close the hinge tongue and
remove the broken latch. There are two holes in the new latch that fit on the two spring ends on the hinge. (The AndisAGC latch has a hole at the top near the hook, an Oster latch is similar but has no hole
and won’t fit on an Andis) The hinge should be Closed
before installing the new latch – hook should
be down toward the hinge. Once you have both spring
ends in the latch holes slide the latch forward so the hook catches on the front of the hinge, it will stay there by itself
if the hinge is closed. Reinstall the metal spacer that goes under the hinge/latch assembly. Round cutout goes towards the drive tongue. Place
the hinge/latch assembly on top of the spacer, line up the holes and insert the screws. Make sure the screws are nice
and tight but don't over tighten, the screws are into plastic, not metal. I mention this procedure because I've seen a lot of clippers where the latch wasn't installed
properly and the spring ends became bent over and the latch is loose and the bent spring may mean the hinge now has to be
replaced too.
| Andis AGC Ultraedge hinge |
|
|
| Blade latch with broken hook and a new latch |
|
|
Slow Running
Andis Clipper. Sometimes your clipper may
be running slow or not run at all. One issue might be a bad armature. The commutator in the picture below has 8 segments.
Each of these segments should measure in resistance within 5% of each other. Use an ohm meter to check the resistance
from one segment to the next.The most common cause of the failure is moisture (like blade washes) getting inside the clipper.
Keep that blade and clipper pointed downward, don't let liquid get inside! A shorted armature will
have little or smaller resistance when measured from one segment to the next. Or you could have a burned out segment which
will indicate very high resistance from the bad segment to the adjacent segment. In these two cases the armature will have
to be replaced. Andis armatures are the most expensive part in the Andis AG/AGC clippers runing near $40. Often the switch
board goes bad when the armature fails or sometimes a bad switch board will take out the armature.
Sometimes
it’s the field magnet that has gone bad due to being dropped. If a magnet section gets broken or cracked the clipper
can overhead or run slow, even a small piece cracked can cause problems. Inspect the inside of the field. If
you see a crack or broken pieces, it’s
junk and replace with a new field. This is not an expensive item. Another
common cause of slow running or failed Andis motors is getting blade wash
inside the motor. This can short segments and can also destroy the switchboard making for an expensive repair.
The clipper must be kept pointed downward when using blade wash and kept down until the excess wash is wiped off with a cloth
rag or paper towel. Some pictures below will show some of the liquid inside.
| blade wash inside clipper keep clipper front down! |
|
|
| Blade wash ruined this armature! |
Oster
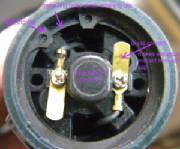
clipper not running. There are several issues that can cause an Oster to stop running or run intermittently. The most common cause is a break of a wire inside the cord. As the cord flexes in use a wire can break.
This usually shows up as a intermittent that happens when the clipper is in certain positions.
The fix is to have the cord replaced. Other times it can be that the switch
nut has broken off or became missing. This allows the switch to move inward and flexes the switch wires until one or more switch wires breaks. If this happens on a 1 speed, the clipper
will no longer run when switched on. Check for a missing switch nut. On a 2sp Oster, it may mean it will only
run in 1 of the 2 speeds. The fix is to have the switch replaced and a new switch nut installed.
Check your switch nuts weekly and tighten the nut if it is becoming
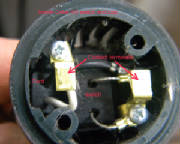
loose. Dropping the clipper can break off the switch but this will be obvious as there won't be a toggle to toggle! Note that on the 2 speed switch the outer two wires go together to the brass
terminal. The center switch wire goes to the 110 V power cord wire. The other power cord wire goes to the other brass terminal.
See diagrams below.
Occasionally
the rear swich terminals on an Oster clipper fail to make good contact and the clipper stops running
or runs intermittently. If neither of the 2 problems above apply this may be the cause. Remove the 2 screws (#1 Phillips)
and remove the switch cap. Check the 2 brass terminals inside the clipper. They may need to be bent upward to make good contact
with the two terminals inside the switch cap. See photo's below. Note that there is a notch in the body of the clipper that
matches a tab in the switch cap. When replacing the switch cap do not over tighten the two screws. Adjusting these two screws
in or out may make the clipper run faster or slower. You want it to run at its highest speed. The reason this may affect the speed is
that the Oster A5 uses sleeve bronze bearings which need to be aligned front to back to run at maximum speed. In the shop
these bearings are adjusted by measuring the current draw when the clipper is running. For the clipper user, your ears will
be your best asset. Internally
a bad coil or shorted / open armature can cause the Oster A5 to stop running. This is a problem that needs
to be sent to a repair shop to diagnose and repair.You can click on the photo's below for a larger image.
| Oster A5 / 76 rear switch |
|
| Oster A5 1 speed switch wiring |
|
| one and two speed switch wiring |
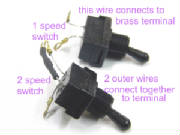
|
| Wiring of Oster 2 speed switch |
|
|
Lister
clipper problems. Blade no longer moves, often a screeching noise is heard. The motor is running normally.
Most likely the plastic gear that drives the blade drive has stripped and has to be replaced. Not a do it yourself service
for most folk. The gear may have stripped due to the lack of blade oiling and the blade is frozen in place and the gear strips
trying to move the blade. Another cause is too much blade tension. How to set the correct Lister blade
tension: The tension screw should be turned all the way down then backed off 1 1/2 turns. If the blade isn't cutting
at that tension get the blades sharpened! Similar
if the blade is jammed in use. Lister
motor doesn't run. There is a reset button in the back, push that in and try the motor again. The reset is part of
the electronic switch board. The board may just be blown and the reset is useless then. Lister blade rattles. Usually this is caused by the white pints the large comb blade sits on becoming misshapened
or broken. There is a metal pin in the center of the blade mount. Both the pin and white plastic get removed and a new set
hammered in. Lister motor running hot: The
black filter may be clogged and should be changed. You should be able to see light through the filter, if you can try blowing
it clean, better to have it replaced. It just slides out.
Oster and Stewart
Clipmaster clippers. Note that these Oster clippers can have a cattle or sheep head on the clipper body. The Clipmasters
may be single speed or variable speed. The cattle head has a multi leaved Yoke and sometimes one or more of the leaves breaks.
A new yoke is called for. The two pins on the yoke may get so rounded that no longer hold the small cutter blade in place.
Replace the yoke if they have become rounded. The drive has a brass block which fits into the yoke. These are inexpensive
but need to be there and be oiled through the top hole. Inside the head of both the cattle and sheep heads are two gears.
The gears need to be greased. Best to remove the two small screws and remove the cover. Pull out the small gear and grease
the shaft and put some grease around the larger gear. Don't over grease. Reassemble. Put the two screws in slight loose and
then fit the head on the clipper body. Once it seats remove and tighten the two screws. Make sure there is a rubber gasket
where the motor shaft exits the body before you put the head back on. It can fall off on you. Clipmaster
not running or switch problems: If
the clipper doesn't run when switch is turned on try wiggling the power cord where it goes into the clipper body. A break
internal wiring may be the culprit. Have the cord replaced. Depending on the switch type
the cords black wire is soldered in on the single switch and the black wire is pushed into the variable speed switch where
it says Line on the switch (new switch only). One of the coil white wires is soldered to the white power cord wire. On the
variable speed switch one of the coil white wires is pushed into the hole marked Load. Before you replace the
switch you should check the voltage at the two brass brush holders with a AC volt meter. If you have no voltage
either the cord is bad (or not plugged in), or the switch is bad if turned on. Motor not running, not the cord or switch. A bad coil or armature, bad brushes. First
check the brushes to see if they are too worn or broken. A weak brush spring can cause a brush problem too. If the brushes
are an inch long and not stubs they are probably good. Check the armature by measuring the resistence of the brass segments,
either next to each other or on opposite sides of the armature, You want to see uniform resistence values. If one is very
high (open) or very low (short) the armature needs to be replaced. Check that the coil is sitting on the two plactic stubs
in the front. If they are broken then the case has to be replaced before replacing the armature. The coil may be bad too if
it has twisted due to broken stubs.
|
|
Adjusting loose
blade or blade rattle due to a spread socket. The tabs on the socket can become spread for several
reasons. Sometimes the metal becomes cracked and the tab can’t hold position.
If the metal is cracked the socket has to be replaced. Sometimes the blades are removed with a sideways twist
which can spread the socket. If spread, the socket needs to be closed with pliers as shown
in the photo below. A delicate touch is needed. Squeeze a little and try fitting the blade on the clipper and try to
twist side to side. If the twist is gone, stop. If still loose, tighten a bit more. If too tight try using the palm of your
hand to press the blade on. If that doesn’t work carefully spread the taps outward with the pliers until the blade fits
snug.
| Adjusting Socket Spread |
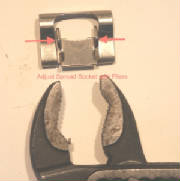
|
| Adjusting Socket for up & down rock |

|
|
|
|
|
|
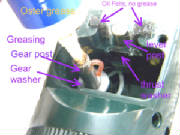
The
Oster A5. The picture below is a new Oster case. The arrow points to several
features. The gear post gets grease squeezed down it until grease comes out of both
the upper and lower holes. Make sure there is a gear washer at the bottom of the post before greasing
if the gear is removed. The drive lever fits over the lever post. In Conair clippers that
mimic the Oster A5 these two posts often become loose and the clipper won’t clip. The case has to be replaced
in this case. The thrust plate can get a hole worn in it. Inspect and rotate the square thrust plate or reverse
it. If a hole is all the way through this part should be replaced. The end of the armature pushes into this thrust plate.
Two felt pieces fit on each side of the lever and these get oiled only, no grease. The lever
and link pieces get their holes greased before assembly. If you can move the lever by hand back and forth the
lever and link should be replaced. Pictures of these parts below the case picture.
| Oster A5 hinge and latch |
|
|
| undefined |
| Greasing and oiling the Oster gear box area |
|
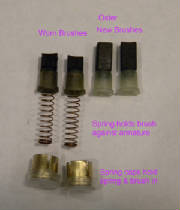
Clipper brushes
are made of carbon which conducts electricity.
The end of the carbon brush is curved to fit tightly against the motor armature. When replacing
brushes you must make sure the curve of the brush is orientated to match the curve of the armature inside. Double
check. A spring keeps the brush tightly contacting the armature. A cap (Oster and Andis AG) keeps the
spring in place. In the AGC an internal spring clip keeps the spring in place. Brushes become worn as the motor turns.
The Oster brushes are softer and wear more quickly than Andis brushes. Turbo brushes will wear faster due to the higher RPM
so expect to replace them more often. As brushes wear carbon builds up on the armature commutator. After a while the armature
needs to be cleaned to achive maximum speed in a clipper. Non-conducting cleaning materials should be used only. To check or replace AGC brushes requires that the motor be removed. Remove the four screws
from the bottom of the case. Two short ones and two longs ones. Short in back, long in front. Make sure the clipper is unplugged. Lift off the
upper housing and note the position of the cord, hanger, switch, motor and so on. Pay attention because it all has to
go back together. Pull off the two copper wires and that plug onto the switch board then remove the two screws
that hold the switch on. Next close the hinge first and remove the two screws that hold the hinge and latch on and the keeper
plate. Take note of the orientation of the parts before you remove them.
Lift out the motor and carefully unclip one of the two brush/spring covers. There is a small spring under the cover
so go slow and be ready to catch the spring. remove the brush noting that the copper wire attached to the brush is at the
top. If the brush is ok reinstall the brush with the curve of the brush matching the curve of the armature and the copper
wire at the top so it fits in the slot. Use the wire to pull the brush all the way in. Note
that If you see any moisture on the brush you have a problem and the armature may be gone. Moisture inside is not your friend. Carefully put the brush spring in next and fit the brush/spring
holder back on. You did note which direction the spring holders were facing right when you took them off? If the brushes were
worn out then put in new brushes instead of the old ones. Fit the motor back in the lower case, and reinstall the parts and
screws. Keeper first, then the hinge and latch. Put the switch board back in and then insert the two screws that hold the
switch and back of the motor to the lower housing. There should be a switch insulator on the switch. It tends to fall
off easily so look for it. Plug in and
test before closing up. Oh yes, the AGC hanger tends to fall out easily too. Make sure that's in place before putting the
upper housing on. Make sure the switch is in the off position and the switch position in the upper housing is also off (back)
before fitting the upper housing on. Hold the upper and lower housing tight (hanger
still in place?, cord fitting in right?) then put the two shorter screws in the back and the two longer screws
in the front and tighten but don't over tighten. Congratulations.
| Oster A5 and 76 brush assembly |
|
|
|
|
|
|
| Oster Clipmaster Large Animal |
|
|
| Oster Clipmaster variable speed switch wiring |
|
|
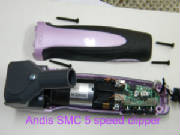
| Andis SMC 5 speed internals |
|
|
|
|
|
|
|
|


